This piece covers Sony SRS XG500 Mega Bass speaker charging instructions. Do this easily through the barrel style DC input port, behind the water resistant door, as we’ll show in the pictures below. Note that you can still play this speaker while it charges, without raising the recharge time much.
Sony SRS XG500 Charging Instructions: Summary
- First, the unit comes with a suitable charger. So use this one if you can. But if you lose yours, then be sure to pick a strong enough adapter. This particular speaker requires 80 watts (20 volts at 4 amps).
- Next, connect the DC end of the charger to the speaker and plug the other end into a working AC outlet
- Then after three or so hours, the XG500 finishes charging. So it’s ready to play once more for up to thirty (30) hours before needing another recharge.
Sony SRS XG500 Charging Instructions: Step by Step
1. Choose Correct Size AC or Car Adapter
The charger you use should provide 20 volts and at 4 amps (80 watts). Here, we use the adapter that Sony includes with this speaker. Note that the XG500 has no USB port specifically for charging its battery.
2. Open the Port Cover
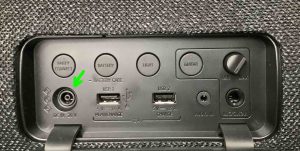
Use a fingernail, dime, penny, or small screwdriver to work open the waterproof seal port cover on the XG500. See the closed power port door in the next picture. Be careful not to scratch the delicate seal around the inside edge of this door.

Prying open this door exposes the barrel type charging port inside.
3. Power OFF the Unit to Continue with Sony SRS XG500 Charging Instructions
Note that the SRSXG500 still charges when powered ON. But depending on how much extra recharging juice your power supply offers, the speaker might charge a bit faster when turned OFF.
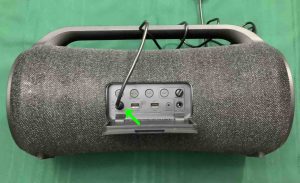
4. Plug the Charger’s DC Cable into the Speaker
Then, plug the matching end of that cord into the port.
Warning: Only use the 20 volt DC input port for charging the speaker. Do not use either of the USB-A ports, as these are for for power output only or thumb drive use. So, feeding power into these USB ports will not only fail to recharge the 500, but this could also damage the electronics inside the speaker.
5. Plug the Power Supply into a Working Wall Receptacle
Now that we connect the 500 and our adapter, we then plug the mains end of the adapter into a working AC outlet, as we see next. We plugged ours into a surge protecting power strip.
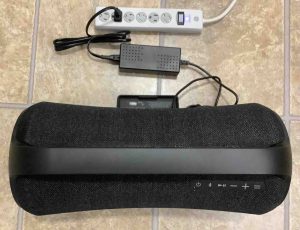
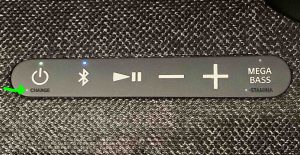
The CHARGE lamp lights up solid orange on the speaker. And while no battery status gauge shows percentage of charge, the glowing lamp means that charging is occurring, as we see next.

6. Let the XG 500 Charge Until the CHARGE Light Goes Out
Full battery charging is finished when the CHARGE lamp in the speaker’s top button panel shuts OFF.
7. Unplug the Charging Cable from the Speaker, to Continue with Sony SRS XG500 Charging Instructions
8. Fully Close the Port Door / Cap
Note that unless you seat the port cap securely, water may soak the ports behind it. And, since water and electronics generally do not work well together, getting these connectors wet might damage their sensitive contacts. So be sure to press this door closed with enough force to fully seat it, for maximum moisture protection.
9. Done with Sony SRS XG500 BT Speaker Charging Instructions
We have now fully charged our XG500.
Finally, repeat this recharging every thirty hours of play, to keep the battery in top condition for years to come. Or if you do not use the speaker for a long time, at least top off the battery charge every six months or so.
Other Posts About the Sony SRS XG500 Speaker
- How to Turn OFF Lights on Sony XG500
- How to Turn ON the Party Lights
- Sony SRS XG500 Buttons Instructions
- Sony SRS XG 500 Charging Indicator Explained
- When the XG500 Won’t Turn ON
Related Posts to Sony SRS XG500 Charging Instructions
- The Sony XB13 Charging Light Stays ON Problem
- Sony SRS XB13 Charging Instructions
- How to Fix Sony SRS XP500 Not Charging
- Sony SRS XP500 Charging Instructions
- How to Know if the Sony SRS XG500 is Charging